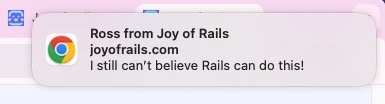
You may have heard news: Rails 8 will extract a new framework for Web Push in Rails. Web Push notifications are powerful because they allow your Rails application to engage with your users even when they’re not on your site.
Web Push is a technology enabled by making your Rails app a Progressive Web Application (PWA). With Rails 8, new apps are PWAs by default.
And with the pending release Rails Action Notifier, due in Rails 8.1, it may be helpful to know how things will work under the hood. In this article, we’ll cover the basics of implementing Web Push yourself with Rails.
This article has something you won’t find in most posts about Web Push: a working demo! (in supporting browsers and devices) 😅. Try it below.
Link to heading Demo
Want to see it in action?
Normally, a Web Push notification would be triggered by some event on the server side. This demo allows you to send a push notification to yourself by clicking a few buttons in this article.
First click the Subscribe button below. You may have also need to accept a browser dialog to allow notifications.
Try sending a web push notification using the form below. The first text box will be used as a title and the second text box represents the message body. Click the button to send a push notification to yourself.
I’m not persisting this subscription on the backend in any way so you will only receive a notification if you click that button. You can also click "Unsubscribe" to remove the push subscription from your browser at any time.
Link to heading Troubleshooting
If you’re interested in sending Web Push notifications, then it will be good to know why they might work.
Link to heading Browser support
Most web browsers support Web Push notifications (according to caniuse.com), but let’s check:
Does your browser support Web Push Notifications? Maybe?
To render the test, this article is running a small snippet of JavaScript similar to this:
if (window.PushManager) {
  // the current browser supports the Push API and Web Push Notifications
} else {
  // fallback for browsers that don’t support this feature
}
For some browsers, you may need to add the app to your home screen before Web Push notifications can be enabled. You can try that with the Joy of Rails install button:
You can use the install button above to either launch the installation prompt in supporting browsers or, at least, view installation instructions for your browser. When the process completes, Joy of Rails will be available a standalone application on your device.
Link to heading Browser notification settings
You may have been able to Subscribe to Web Push but you still didn’t get a notification. If you’re in a supported browser, it’s possible that notifications are disabled in your browser which means when the Web Push event is received the Service Worker won’t be able to trigger a notification. 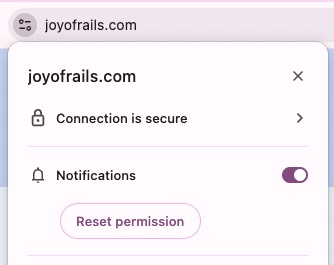
Try checking your Notification settings. This setting can be controlled per origin. In Chrome for macOS, for example, you should be able to check your Notification settings for any site from the address bar.
Link to heading System settings
You also might need to check you operating System Settings.
In macOS, for example, you may need to go to the System Settings app and the Notifications settings for your browser: 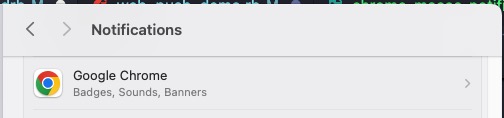
System Settings on macOS also has a Focus tab with a Do Not Disturb feature. It’s easy to forget about this one—ask me how I found that out while testing this article after hours. 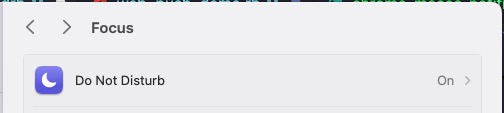
Link to heading Expired Subscriptions
Another reason a Web Push notification fails to deliver could be because your browser’s Web Push subscription to this site has gone stale. This may be unlikely if this is the first time visiting the site, but the likelihood increases especially if you’re coming back to the site after some time. So you could try resubscribing using the buttons above.
Link to heading Bug 🐞 ???
Finally, it’s possible I’ve introduced a regression since the last time I tested, so you could check your web browser’s dev tools for JavaScript errors. Feel free to report an issue on GitHub with supporting information if you think there’s a bug.
Link to heading How does it work?
There are three parties involved in delivering a push message.
- Your Application Server
- Your user
- A Push Server
When your Rails app determines something is worthy of notifying a subscribed user, it makes an HTTP request to a Push Server endpoint with the user’s Web Push subscription and a message payload. It’s this third party Push Server that actually sends the notification to the user. 
One thing developers miss about this Push Server is a third party, which, in most cases, is managed by the big company behind your browser, namely Google, Apple, Mozilla, or Microsoft.
As the developer implementing Web Push, you’ll need to do the following:
- provide a user experience for a visitor to subscribe to Web Push,
- send the Web Push subscription data to Rails from the frontend,
- make a Web Push request to the third party Push Server (using the
web-pushgem), - listen for the
'push'event on the frontend in a service worker to display the notification
Here’s how it works at a high level: 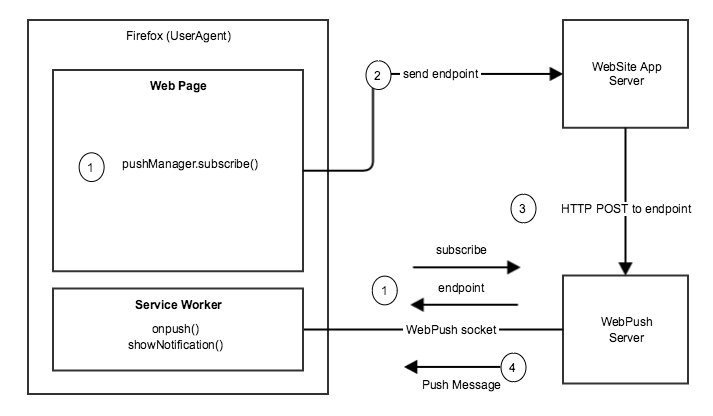
Breaking it down:
We’ll use JavaScript on the user’s current page to register a service worker subscribe to push notifications via the
pushManagerinterface. The browser will make a request to the Web Push server to aPushSubscriptionwhich will contain a unique endpoint to the Web Push server and authorization keys required for encrypting the push notification request body.We’ll post the subscription info to our Rails app to allow the notification to be sent.
To send a push notification, we’ll use the
web-pushRuby gem triggered from our Rails app.web-pushis responsible for encrypting of the message payload and sending the request to "push" the notification for the given subscription via a third-party Web Push server, i.e., Google, Apple, and Mozilla all host their own Push Servers to support the Push API in Chrome, Safari, and Firefox respectively.If the request is successful, the Web Push server opens a socket to our registered service worker which can listen for
'push'events to show a notification to the user. Since service workers have a lifecycle independent of the web page, they can process events even when the user isn’t actively using our website.
Link to heading Web Push Auth is spelled VAPID
Before we jump into the details of sending a Web Push notification from Rails, a word about security.
When a Web Push notification is triggered by an application, like your Rails app, the application authenticates with the Push Service using the Voluntary Application server Identification (VAPID) protocol. Application servers use VAPID to identify themselves to the push servers so push subscriptions can be properly restricted to their origin app servers. VAPID prevents an attacker from stealing a user’s PushSubscription and sending push messages to that recipient from another server.
Luckily, the details of the VAPID spec are abstracted away in the web-push Ruby gem. (I should know, I wrote its initial implementation of the VAPID protocol 😅).
You will need to create and securely store a set of VAPID keys. More on that below.
Link to heading A Recipe for Web Push
Before a Web Push message can be delivered, a few criteria should be satisfied:
- Manifest: A Progressive Web App
manifest.jsonfile is linked from our page to identify our app settings. - Service Worker: In the user’s web browser, a service worker script is installed and activated.
- VAPID: You have generated a set of VAPID keys that will be used to sign Push API requests. This is a one-time step (at least until we decide to reset the keys).
- Permissions: The user has enabled permissions to receive notifications from our site.
- Subscription: The
pushManagerproperty of theServiceWorkerRegistrationis subscribed to push events with our VAPID public key, with creates asubscriptionJSON object on the client side. - Trigger: Some trigger results in a Web Push notification. The
subscriptionobtained from the client is needed to send the Web Push request from Rails. - Listener: Your service worker is set up to receive
'push'events and display a notification.
Link to heading The Manifest
Previously, I wrote about the manifest file in Add your Rails app to the Home Screen - the Ultimate Guide. I’ve provided a quick recap below.
Since the Rails 7.2, Rails provides defaults for Progressive Web App manifest JSON and serviceworker JavaScript files (pull request).
In your Rails 7.2+ config/routes.rb file, make sure you have the following routes added:
Rails.application.routes.draw do
  # Render dynamic PWA files from app/views/pwa/*
  get "service-worker" => "rails/pwa#service_worker", as: :pwa_service_worker
  get "manifest" => "rails/pwa#manifest", as: :pwa_manifest
end
(For another example, check out the joyofrails.com routes.)
We’ll need to register the manifest with the browser by linking from the HTML document. Your application layout should render a <link> tag for the manifest file:
<!DOCTYPE html>
<html>
  <head>
    <!-- -->
    <%= tag.link rel: "manifest", href: pwa_manifest_path(format: :json) %>
  </head>
  <!-- -->
You should also have corresponding files in app/views/pwa:
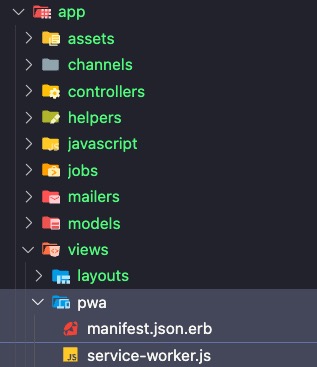
manifest.json.erbserviceworker.js.erb
(Check out the joyofrails.com manifest and serviceworker files here.)
What if my app isn’t on Rails 7.2? That’s ok! If you can’t upgrade now, you can still set up your Rails app similarly. Simply copy the files and routes changes as described here.
For a newly generated Rails 7.2 application, this is what you’ll see in manifest.json.erb:
{
  "name": "YourNewApp",
  "icons": [
    {
      "src": "/icon.png",
      "type": "image/png",
      "sizes": "512x512"
    },
    {
      "src": "/icon.png",
      "type": "image/png",
      "sizes": "512x512",
      "purpose": "maskable"
    }
  ],
  "start_url": "/",
  "display": "standalone",
  "scope": "/",
  "description": "YourNewApp.",
  "theme_color": "red",
  "background_color": "red"
}
The default manifest may be enough for minimal manifest criteria to allow your app be installable, but (as of this writing) browsers may require an icon with dimensions 192x192 (more on icons below).
If you’re not on Rails 7.2 yet, you may also need to add a controller like the one provided by default in Rails 7.2+:
# frozen_string_literal: true

class Rails::PwaController < Rails::ApplicationController
  skip_forgery_protection

  def service_worker
    render template: "pwa/service-worker", layout: false
  end

  def manifest
    render template: "pwa/manifest", layout: false
  end
end
(You can also see the joyofrails.com PWA controller here.)
Link to heading Register the service worker
Next, we need to tell the browser where to find our Service Worker file.
In our application javascript we’ll use this following snippet to request registration of a service worker script.
const registerServiceWorker = async () => {
  if (navigator.serviceWorker) {
    try {
      await navigator.serviceWorker.register('/serviceworker.js');
      console.log('Service worker registered!');
    } catch (error) {
      console.error('Error registering service worker: ', error);
    }
  }
};

registerServiceWorker();
(Here is how the service worker gets registered on joyofrails.com.)
The key bit is navigator.serviceWorker.register('/service-worker.js'). It returns a Promise that, if successful, resolves to an instance of ServiceWorkerRegistration.
We should be able to see the message 'Service worker registered!' in our browser’s dev tools console when the promise resolves.
Link to heading Generating VAPID keys
To take advantage of the VAPID protocol, we would generate a public/private VAPID key pair to store on our server to be used for all user subscriptions.
In Ruby, we can use the web-push gem to generate a VAPID key that has both a public_key and private_key attribute to be saved on the server side.
gem 'web-push'
We can generate the VAPID public and private keys on the Rails console:
vapid_key = WebPush.generate_key

# Save these in our application server settings
vapid_key.public_key.delete("=")
# => "BC1mp...HQ"

vapid_key.private_key
# => "XhGUr...Kec"
The keys returned will both be Base64-encoded byte strings. Only the public key will be shared, both with the user’s browser and the push server as we’ll see later.
Link to heading Requesting Notification permission
Before the notifications can be displayed, the user must grant permission for notifications in a browser prompt, using something like the example below.
export const checkPermission = async () => {
  switch (Notification.permission) {
    case 'granted':
      console.log('Permission to receive notifications has been granted');
      break;
    case 'denied':
      console.log('Permission to receive notifications has been denied');
      break;
    default:
      const permission = await Notification.requestPermission();
      console.log(`Permission to receive notifications has been ${permission}`);
      break;
  }
};
You should be able to adapt this logic to fit your own user experience, such as to message the user that Web Push will be disabled as long as their browser’s notification permission is denied.
Link to heading Subscribing to push notifications
The VAPID public key we generated earlier is made available to the client from Ruby.
<!DOCTYPE html>
<html>
  <head>
    <!-- -->
    <%= tag.meta name: "vapid-public-key", content: Rails.configuration.x.vapid.public_key %>
  </head>
  <!-- -->
Your application javascript would then use the pushManager property to subscribe to push notifications, passing the VAPID public key to the subscription settings.
const vapidPublicKey = document.querySelector(
  'meta[name="vapid-public-key"]',
).content;

export const subscribe = async () => {
  const registration = await navigator.serviceWorker.ready;

  let subscription = await registration.pushManager.getSubscription();

  if (!subscription) {
    subscription = await registration.pushManager.subscribe({
      userVisibleOnly: true,
      applicationServerKey: vapidPublicKey,
    });

    if (!subscription) {
      console.error('Web push subscription failed');
    }
  }

  return subscription;
};
The call to pushManager.subscribe() returns a Promise that provides the PushSubscription instance with all the information the push service needs to send a push message to this user’s browser. This includes an endpoint, the URL on the push server where we’ll send the push request, and a pair of keys labelled as p256dh and auth required to encrypt the push message payload.
// subscription.toJSON();
{
  endpoint: "https://android.googleapis.com/gcm/send/a-subscription-id",
  keys: {
    auth: 'AEl35...7fG',
    p256dh: 'Fg5t8...2rC'
  }
}
If you are interested to learn more about how this encryption works, check out this detailed summary on Web Push payload encryption.
In the example below, we send the subscription object to our backend. It could be stored in a session or database record.
import { post } from '@rails/request.js';

const registration = await navigator.serviceWorker.ready;
const subscription = registration.pushManager.getSubscription();

const {
  endpoint,
  keys: { p256dh, auth },
} = subscription.toJSON();

const body = JSON.stringify({
  push_subscription: { endpoint, p256dh_key: p256dh, auth_key: auth },
});

post('/push_subscriptions', { body });
Note that, once subscribed, pushManager.getSubscription() returns a Promise that provides the PushSubscription instance with all the information the push service needs to send a push message to this user’s browser.
A database record to store a subscription would store the endpoint, auth key, and p256dh and is tied to an account record, like a User. Storing the user_agent is an optional convenience.
create_table :push_subscriptions, force: :cascade do |t|
  t.references :user, null: false, index: true
  t.string :endpoint
  t.string :p256dh_key
  t.string :auth_key
  t.timestamps

  t.string :user_agent
end
class Users::PushSubscriptionsController < ApplicationController
  def create
    if subscription = @push_subscriptions.find_by(push_subscription_params)
      subscription.touch
    else
      @push_subscriptions.create! push_subscription_params.merge(user_agent: request.user_agent)
    end

    head :ok
  end

  private

  def push_subscription_params
    params.require(:push_subscription).permit(:endpoint, :p256dh_key, :auth_key)
  end
end
Link to heading Triggering a Web Push notification
Imagine a use case for your Rails app to trigger a Web Push notification. Perhaps you published a new article and want to inform your readers.
Now it’s time to trigger the request to the Push Server with the web-push gem. Here’s what it could look like as implemented in an ActiveJob:
class WebPushJob < ApplicationJob
  queue_as :default

  def perform(title:, message:, endpoint:, p256dh_key:, auth_key:)
    message_json = {
      title: title,
      body: message,
      icon: ActionController::Base.helpers.asset_url("app-icons/icon-192.png")
    }.to_json

    response = WebPush.payload_send(
      message: message_json,
      endpoint: endpoint,
      p256dh: p256dh_key,
      auth: auth_key,
      vapid: {
        subject: "mailto:[email protected]",
        public_key: Rails.configuration.x.vapid.public_key,
        private_key: Rails.configuration.x.vapid.private_key
      }
    )
  end
end
The WebPush.payload_send method requires you to provide the user’s subscription attributes, VAPID public and private keys, and a message payload serialized as JSON.
For the message payload, I am setting the title, body, and icon properties. The MDN Notification docs and this web.dev Notification article are good resources to learn more about the options you have available.
subscription = user.push_subscriptions.last

WebPushJob.perform_later(
  title: "Hello from Joy of Rails 🌈",
  message: "You can subscribe to my newsletter below! ",
  endpoint: subscription.endpoint,
  p256dh_key: subscription.p256dh_key,
  auth_key: subscription.auth_key
)
To trigger the job, we just need to deserialize the user’s subscription and to send them a worthwhile message 😉.
Link to heading Displaying the notification
Because the service worker runs in the background, this is where we need to listen for Web Push notifications delivered from the Push Server.
In app/views/pwa/serviceworker.js.erb, we can use the service worker API to show notifications when the 'push' event is received:
const onPush = (event) => {
  console.log('[Serviceworker]', 'Push event!', event.data.json());
  const { title, ...options } = event.data.json();

  const showNotification = self.registration.showNotification(title, {
    icon,
    ...options,
  });

  event.waitUntil(showNotification);
};

self.addEventListener('push', onPush);
The MDN docs are a good resource for more on service worker self and the service worker API.
After all that setup, we should see a browser notification triggered via the Push API.
Link to heading Examples
Want to see an example of how the Web Push subscription JavaScript can be packaged up in a Rails Stimulus controller? Here’s the source code for how it’s done on joyofrails.com.
If you purchase Basecamp Campfire, you can peruse the Rails source code as they have also implemented Web Push subscriptions on the frontend as a Stimulus controller, store the subscription data in an ActiveRecord model, and use the web-push gem to send notifications in an ActiveJob.
Link to heading Wrap up
Overall, the Web Push API is an interesting step for the web in terms of feature parity with mobile.
As you can see, Web Push takes quite a bit of setup. Things may get easier once Action Notifier is released. Even when it is released, I think this article will still be relevant to help you understand the key ingredients of what’s required to wire up native push notifications with web technology.
I’d be interested to hear how things are working out for folks integrating Web Push into their web apps.
What do you think?
One more thing—a great resource to learn more about Web Push is the Pushpad blog from the maintainer of the web-push gem!
If you liked this article, please feel free to share it and subscribe to hear more from me and get notified of new articles by email.
Did you find a bug or do you have questions about the content? You can send me an email, connect with me on Twitter, Github, Mastodon, Bluesky, and/or Linkedin.
Curious to peek behind the curtain and get a glimpse of the magic? Joy of Rails is open source on Github. Feel free to look through the code and contribute.
That does it for another glimpse into what’s possible with Ruby on Rails. I hope you enjoyed it. 
More articles to enjoy
-
Add your Rails app to the Home Screen - the Ultimate GuideRails 8 will support Progressive Web Apps (PWA) out-of-the-box but you have all the tools you need to make your Rails app installable today.
-
Introducing Joy of RailsJoy of Rails is a Rails application dedicated to teaching and showing programmers how to use Ruby on Rails and highlighting news, notes, and contributions relevant to the broader Ruby on Rails community. It is open sourced on Github.
-
Custom Color Schemes with Ruby on RailsYou can edit the color scheme of this website right in content of this blog post. Play with the controls while we highlight the benefits of Rails, Hotwire, and CSS variables.